The Verdict
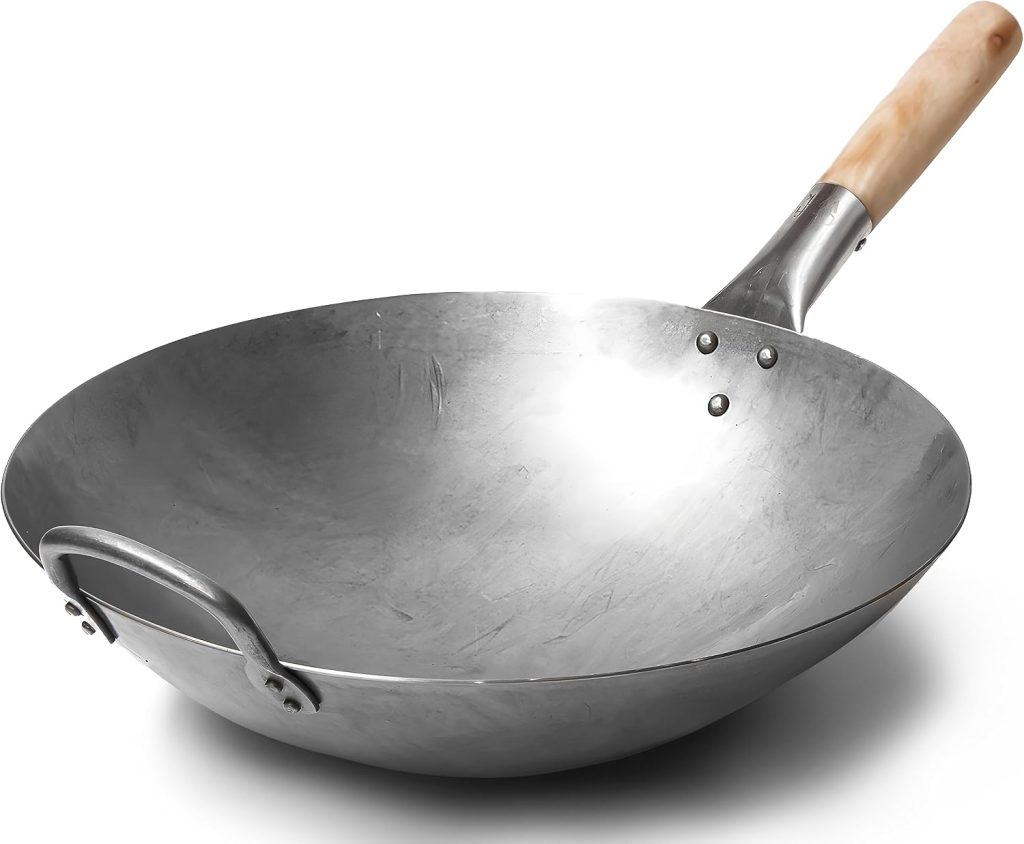
The Craft Wok 14-inch hand hammered carbon steel wok brings commercial-grade performance to your kitchen with its traditional round-bottom build and heavy 15-gauge construction. Hand hammered by masters in Guangzhou, it provides the authentic heat distribution and tossing control needed to achieve restaurant-style wok hei over open flame or gas burners.
Why We Love It (Key Features)
- Commercial-Grade Carbon Steel Build: Made from 15-gauge (1.8mm) carbon steel weighing 4.6 pounds (2.1 kg), this heavy and sturdy pan withstands intense heat while delivering reliable, long-lasting durability.
- Traditional Round Bottom Shape: The classic curved basin naturally directs ingredients toward the center, making quick tossing smooth and ensuring optimal heat concentration for authentic stir-fry flavor.
- Dual Handle Design: The wooden main handle features a natural hygroscopic non-slip surface for a secure, comfortable grip during rapid motions, while the steel helper handle resists heat during high-flame cooking and offers hanging storage.
- Versatile Outdoor and Gas Compatibility: Engineered specifically for home gas stovetops, high-heat professional jet burners, open campfires, and BBQ grills.
Pros & Cons of This Hand Hammered Carbon Steel Wok
- Pros: Heavy-duty 15-gauge (1.8mm) carbon steel construction crafted by Guangzhou masters.
- Pros: Curved round bottom engineered for authentic tossing motions and heat distribution.
- Pros: Heat-resistant steel helper handle doubles as convenient hanging storage.
- Pros: Comes with complete step-by-step seasoning instructions.
- Cons: Not compatible with flat electric or flat induction cooktops.
- Cons: At 4.6 pounds (2.1 kg), it requires two-handed handling and ongoing seasoning to prevent rust.
Who Should Buy This?
This wok is ideal for home cooks, open-fire cooking enthusiasts, and aspiring stir-fry chefs with gas ranges, outdoor grills, or specialized wok burners who want a heavy, time-tested tool capable of genuine high-heat technique.
Frequently Asked Questions
Can I use this hand hammered carbon steel wok on an electric or induction cooktop?
No. This wok features an authentic curved round bottom that cannot function properly on flat electric or flat induction cooking surfaces. It is designed exclusively for gas stoves, open fire, BBQs, grills, and turbo fast wok burners.
Does this carbon steel wok require seasoning before use?
Yes. Raw carbon steel can rust if left untreated. The wok requires initial seasoning and ongoing care, and it includes complete step-by-step seasoning instructions to guide you through the process.
How heavy is this wok, and how do I store it?
The wok weighs 4.6 pounds (2.1 kg). For storage, the heat-resistant steel helper handle provides a convenient built-in loop so you can hang it securely when not in use.


5.0 out of 5 stars Beautiful Wok - AND here is the ONLY correct and complete guide to tempering this great Wok! Excellent traditional carbon steel wok. BUT — and I emphasize this — it MUST be properly tempered before use. None of the YouTube videos or comments I have seen understand this process, and you probably will not either. So read on.This process of preparing the wok is NOT really a “seasoning” — that implies some sort of cooking process. What is need is very high temperature tempering of the bare steel surface. This is metallurgy, not cooking! It is an ancient process used on steel to “blue” it. It is the same process used on old steel swords and gun barrels, to give them a protective non-rusting black-blue coating. Let me explain the “bluing process” you need to perform on your new wok.Carbon steel is chemically very reactive. It rusts — it reacts with oxygen and forms red iron oxide, Fe2O3, when exposed to oxygen, such as the oxygen in H20 water. Rusting, or red iron oxide, will form quickly on naked steel that is not properly prepared. The naked iron is also reactive with food moisture, and food will stick to it. BUT black iron oxide, formed on a steel surface that has been heated to HIGH temperatures, is less reactive, more stable, and adheres extremely well with oils. When well-oiled, the oil incorporates in the black iron oxide surface on the steel; this provides a non-reactive coating that protects the steel.So what you need to do is BLUE the steel — heat it to a very high temperature, and let the surface steel oxidize to black iron, Fe3O4, also called magnetite. Again this is not cooking. This is metallurgy!!Let me repeat: If clean carbon steel is heated to above 550 degrees F. it reacts with the oxygen in the air, and the surface steel will oxidize to black iron oxide, Fe3O4. This black surface gives the steel a beautiful black-blue to aqua-blue patina. This blued steel, or black iron oxide surface, adheres quickly to oils. When coated with oil, the oiled blued steel is very rust resistant, it is also a non-stick surface for cooking. And it has been used by blacksmiths (and Chinese cooks) for millennia to treat steel surfaces.The instructions that come with the wok tell you what to do. Do it. But they are brief. Here are the details.FIRST STEP, you must clean the steel. It comes covered with oils to prevent rusting. You MUST strip all this oil off, to expose the bare steel surface. As instructed, use a scouring pad and go at it with detergent. Plan on working 30 minutes at this. Scrub, and rinse. Scrub and rinse. Take a white paper towel and rub the surface dry. If you are still getting black staining on the paper towel, then scrub some more. You want NAKED steel, without any oil residue on it. If there is oil on it, the oxygen cannot reach the surface when it is heated and oxidize the surface steel to black iron oxide, the beautiful blue magnetite surface you want.SECOND step is heating to HIGH temperature. The instructions say put the wok on high heat until the steel turns BLUE. Few people understand what that means. It means REALLY heat the steel, really really really heat the steel — all of it, all of the wok.This requires a very hot gas flame. Use a 12,000 to 15,000 BTU (or higher) burner to do this. A BBQ is not hot enough, your oven is not hot enough. This is big flame on bare steel hot. Most modern stoves have at least one big high output burner. On my stove, I can take off the top diffuser plate from the big burner and and get a single huge gas jet — this is what I use both for the bluing and for wok cooking. So get going. You might want to wear some heavy gloves while doing this. This is blacksmith work, not cooking. Keep animals and children away. If you touch that hot steel, it will not just burn you, it will brand you. Over a 15,000 BTU jet flame, it took my about 30 to 45 minutes to totally blue the entire wok.Turn the heat on high. Put the wok on the hot flame, and wait. And wait. And wait. You must heat the steel to over 550 F. (around 300 C.) before the steel will begin oxidizing properly. First you will see orange yellow steel, then suddenly it will start to look “blue.” That blue is the black iron oxide surface forming — the black iron on top of the silvery steel underneath gives a bluish color. If you have properly cleaned the wok, there will be very little to NO smoke. Smoking indicates you did not properly clean off the oils, which are burning and smoking, and probably contaminating your steel surface. If you are getting lots of smoke, STOP. Go back to step one and get the steel cleaned of oils.Now watch the blue surface expand. Carefully turn the wok over the hottest portion of the flame, move the wok very slowly so the blue transformation moves all the way to the edge. Slowly, very slowly, move up and down and around over the fire, working outward from the hottest blue edge, from center to top, expanding the blue area. When you are done, the ENTIRE surface of the wok should be beautiful blue steel. This is the the black iron oxide coat to the steel called “bluing.” If there are orange or yellow-orange areas on the wok, then you did not fully heat and transform them. Heat them again until they turn blue.Okay, blacksmith work done. The factory could do this I suppose, but none do. Chinese cooks know how to do it on a hot fire — and a wok lasts a lifetime, so one only needs to do it once in a life!STEP THREE. We are following the instructions that came with the wok. I am just explaining. Let the wok cool. If you put oil on that 550 degree F. steel, you will have a kitchen of smoke! When it cools quite a bit, put it back on medium flame. Now oil it, following instructions. This part may cause some smoke. It you are getting lots of smoke, turn the heat down. Use a high-temperature tolerant cooking oil, like Safflower oil, refined Light Olive Oil (NOT regular olive oil), or Peanut oil. Canola oil also works, but I hate the smell of hot Canola oil.The black iron oxide surface you have created on your “blued” carbon steel wok loves oil. It combines with oil quickly, it hugs and bonds with oil. And when coated with oil, it is a surface that is both non-stick, and non-reactive to rusting. Look at the color! It will be shimmering with an agua-blue hue, not a really black color.Cool the wok a bit. Turn it over. Look at that beautiful blue-black surface of magnetite you have created by proper tempering. It will be darker and thicker on the outside surface, which got hotter. Coat the outside with a thin coat of oil. Marvel at the pretty color. Coat it with more oil occasionally.There you have it. Your are now ready to use the wok. It is properly tempered, blued; you have created a traditional non-rusting, and non-sticking surface. Traditionally, now start the wok by cooking onions and ginger. This “seasons” the surface. This is the only part of the process properly called “seasoning a wok”!Attached are a few photos. In the first one, I added a faded blue sink cloth to help show the color. Notice the aqua-blue hue of the metal? This is blued steel color. (I have cooked a few dishes in this pan, so there is some brown oil gunk at the bottom.) At the top of wok, by the handle rivets, you will see an area that is orangish to silver — well, that is an area I did not get properly blued. It was hard to get that area hot enough. So it goes, the job was less than perfect. But you should not have many areas like this on your perfectly blued steel wok.The second photo shows the outside surface, and its beautiful blue-black iron oxide surface. This is what you are shooting to obtain in this process.The third photo shows my stove burner on high flame, with the top diffusion plate remove. This gives a real jet flame, and I use it this way for wok cooking. I used this flame for the bluing process. Is that safe, you ask? Well, so far, both I and the stove are doing well, thank you. But I can offer no further guarantees. I added a photo of the wok on the jet gas flame, with the diffuser plater removed. Believe me, it is perfect for wok cooking.Addendum: Someone asked me about the handle wrap. I added another photo. The lower metal section of the handle gets very hot while cooking, and it is easy to slide your hand on to it. Ouch. I do what our cook in Taiwan did when I was a kid fifty years ago. I wrap it tightly with cotton fabric. Take an old t-shirt, cut a three inch wide and fairly long piece. Wrap the metal very tightly with several wraps of the cotton strip. Then put on a wrap of old-fashion friction tape over that to hold the wrap tight. Tuck the top and bottom ends of the cotton under the wrap. Coat the friction tape with some corn starch or flour to take away its sticky surface. This lasts a long time, and is easy to redo if needed.How to maintain: Simple. Never use abrasives (like a steel scrub) on the surface; doing so will remove the finish. Never use a detergent on the pan; doing so will remove the oil finish on the bluing, and detergent may contaminate the oil coating. One can usually clean the surface with very hot water and a kitchen dish brush. It really is a non-stick surface, when properly prepared and used. After washing, dry well and wipe a few drops of cooking oil over the inside and outside. And of course, don’t store it in a wet place.Loose handle problems, another addendum: The wood of the handle of the wok dries and shrinks, and the handle may get loose after a few weeks of use; mine did, others report the same thing. This is a common problem with wood from high-humidity climates. To fix the problem, take out the two screws that hold the wood handle in the metal sleeve, then twist the wood as far as you can into the sleeve. Give it a couple solid taps with a hammer to set it tightly into the sleeve. Reinsert the screws. Fixed. Repeat if necessary later; my handle needed only the one fix. The wood of the handle will eventually dry and stop shrinking.Variation: Size: 14-in
5.0 out of 5 stars More Refined Than Tesor--1st Impression Just received the wok today. This is my 1st impression.When I first bought this, it was from a 3rd party vendor. Craft Wok had this out of stock. But when the wok arrived, it was from a different vendor with a different brand–Tesor!Of course, I returned it.However, having seen the two brands first hand, I was given an opportunity to make some quick comparisons.First, the Tesor 14″ wok was truly hand hammered. You could see the hammer marks on the inside of the wok. The wok was not perfectly round, however. I placed my 14″ tempered glass lid on it, it could not form a complete seal. Large gaps existed. The imperfect roundness of the wok and the particular locations of the rivets for securing the handle and the helper handle prevented the lid from sealing perfectly on the wok.But this is not the case with the Craft 14″ wok. The lid sits *almost* perfectly on it. Still a little gap, but tolerable.Also, no hammer marks on the inside of the wok. This leads me to think that the Craft wok is form pressed by some hydraulic ball peen machine rather than crafted manually by a hammer.The inside is a little shallower than the Tesor brand. The latter featured a quite steep incline or decline, depending on your perspective, so it def looks deeper and therefore bigger than the Craft wok.At this point, the Tesor 14″ sells for $39.99, while Craft Wok sells for $47 something before tax.As said earlier, this is my 1st impression. After I temper and season it, and cook some meals in it, I’ll update this review.Yes, I know Lance Owens has an excellent review here on how to properly temper/blue the wok and properly care for it afterwards. I’ll follow his instructions to the tee.But I have the following tips to offer.1. I’ll be using flaxseed oil to season the wok, after it has been properly tempered/blued. The reason is that I’ve heard it bonds better with the now complete bare, naked steel than other oils–peanut, canola, etc.An alternative to this is lard or fresh pork skin. Actually, that is what is traditionally used in China to season a new wok.You could also cook some bacon in the new work as a way to season the wok.Legend has it that the new properly tempered wok is hungry for fat! So for your first meals, cook some fatty foods in it! :)I’m planning on cooking some 红烧肉 for my first meal. It is Chinese for braised pork. It uses some cuts of pork, which contain quite a bit of fat.One-Year-and-Three-Months Update:Well, one year and three months have passed. I have used the wok every day, cooking almost exclusively Chinese stir fry dishes. Half meat, half veggie. The wok has worked fine! I’d say the BEST one I’ve ever owned.The following points summarize my success with the wok:1. Lance S Owens’s instructions on how to temper the wok before the first use are the BEST! You have to temper the wok correctly before the first use. Otherwise, it’d rust!2. I have never used any detergent when washing the wok. Chemicals will hurt the thin film created by the tempering and subsequent cooking. However, contrary to what is recommended, I have used a metallic scouring pad along with cold water to clean the wok immediately after the cooking, and then wipe it clean with an old, dry towel especially for this purpose. The key is to clean the wok immediately after the cooking, and then wipe it dry. If you don’t, then tiny amount of rust will form. If you do not use it as often as I do–every day, that is, then I’d suggest putting a thin film of vegetable oil in the wok, after you have cleaned it with the scouring pad and wiped it dry.3. When using the metallic scouring pad, gently press it against the inside of the wok. No need to use excessive force. I picked my metallic scouring pad from my local dollar stores. Prior to the metallic scouring pads, I tried two bamboo whisks (bought from Amazon), but they didn’t do a very good job and eventually disintegrated. So as a Hair Mary attempt, I gave the metallic scouring pads a try. And they worked out fine! :)Don’t have time to take some pics of the wok now. Maybe later, another time.In short, a very good wok indeed! The BEST I’ve ever owned!Variation: Size: 14-in
5.0 out of 5 stars Here’s my full guide on this wok basically lol, love it to bits By far the best pan I’ve ever owned. It requires more care than a crappy nonstick Teflon type of wok (which is what I had just previous to this) but it is SO SO SO worth it.You do have to “season” the pan prior to use which is where people saying “1/5 rusted, food sticks” etc screwed up. I added pics I took throughout the seasoning process so you can get an idea of how it should look.There’s tons of guides (some much better than others) online for how to season a pan but in case you want the steps of how I did it to achieve the dripless smooth black beauty in the end here ya go:Pre-1. Wrap the handle in foil so it doesn’t get scorched real bad. It still can through the foil but it’ll protect it way better than being right next to open flame.1. Scrub off the factory oil with some regular dish soap and hot water, I used one of those bristly brushes to get around the welds and screws, a lot of people say use a wire brush – I did not out of fear of scratches and I got the oil off totally fine, if you start step two and it starts smoking, that’s because you didn’t get the factory oil off all the way tho.2. Blue the steel (in pic 2 you can see the process starting, it expands out in a ring), you’ll need to rotate the pan around just holding it tilted in each spot for a bit to totally finish the blueing process.3. After it’s completely blued, let it cool a little then rinse it in the sink, use a bamboo brush or a sponge (not wire brush) to gently give it a wash (NO SOAP, just water). Once done immediately place back on stove to heat the remaining moisture out of the wok.4. Using peanut oil (or any high smoke point oil, not olive oil lol) we’re now gonna start polymerizing the pan. So how I did this was I had a bowl and I’d pour a tablespoon of peanut oil into it at a time then using metal tongs squinching an old wash rag (rag will be dead, use one you’re ok throwing away after). Dip the rag into the oil then do circular swipes in the pan (once it’s fully hot).It will smoke. A lot. Like a lot a lot. This is good because it means your oil is polymerizing (turning into a nonstick solid surface, the black sheen). It’s ok to swipe a few times and keep at it to avoid letting any excess drip or bubble. When it slows down/stops smoking, you’re ready to apply another coat/more swipes. You will need to tilt the wok at angles to superheat the sides to get the oil to coat the whole thing, don’t only coat the center. If you notice the sides aren’t smoking as much and are lighter, it’s because the temp is too low on that section and you need to angle the pan to get that area better – more direct heat.When your bowl is out of its 1tbsp oil, add another dollop to dab your cloth in to apply another swiping to the pan. DO NOT just fill a bowl with oil or drizzle it in the wok, I’m serious when I say just a little at a time. The trick to getting your wok free of drips and bubbles is to apply very thin coats at a time and if you dab your cloth in a puddle of oil then soak the wok you’ll have a hard time getting it to polymerize and it will have drips and bubbles all over.5. I applied two extremely thin oil coats to the underside of the wok as well to give a much less dark but still protective coating (after I had already mostly finished polymerizing the inside of the wok, so near the end). It will get scuffed by your wok stand underneath probably but it’s not a big deal.6. Let it cool then give it a rinse in the sink, gently wash (NO SOAP, just water) with a soft sponge or gently with a bamboo brush (I use a bamboo brush). Return to stove, heat out moisture on medium heat and you’re done.I fried ginger slices and garlic slices in it at this step to get the first cook out of the way since some people think the first fry has a slightly more irony taste. No idea if it’s true but I did this step just to be safe lol.It sounds intimidating but honestly it’s not hard at all, just make sure you have good ventilation/a strong fan sucking air out of a window or your place will fill up with smoke fast during the polymerizing stage.AFTERCARE: Cook in wok, eat yummy food, rinse in hot water and DELICATELY scrub with a bamboo brush or soft sponge. NO SOAP. It cleans incredibly easily if you seasoned it properly. Return to medium heat to get the remaining moisture out then swipe it with a very lightly oiled cloth to help protect it from any chance of rust when not in use.If you put too much force into the gentle scrubbing while washing you WILL scuff your patina (the gorgeous finish you worked so hard to get on it) and be super sad. Ask me how I know. :c It’s not hard to patch if it’s just a small scuff though, I immediately put it over max heat and applied a few swipes of oil to polymerize the area and around it again and while you can still tell that the small spot isn’t quite as dark, it’s restored and cooks flawlessly.I know this review was long as balls but I hope it helps give ya a little direction with setting up/using this wok. 100/10 massively recommend.Variation: Size: 14-in
5.0 out of 5 stars Glad I did the research! Fantastic wok! Variation: Size: 14-in
5.0 out of 5 stars Worthy Investment if you Follow the Directions First, thank you to Lance Owen, Nathan, and all the other reviewers with tips and instructions. I was totally intimidated by this process and I’ve never cooked with a wok before. Over the last two days I’ve found myself walking into the kitchen just to admire it – the color is amazing.1. do the research and follow the directions and advice. the negative reviews are by people who did not2. the heating/curing process worked on the only 1200BTU burner on my ministove. the only hitch was getting the inside of the wok around the three handle rivets. I got creative and a little dangerous. but it turned out ok without serious injury (pictured above)3. this is a truly non-stick surface if used correctly. season the wok. before cooking, preheat the wok to smoking, then apply oil (or other fats) for cooking, then you food. anything that has kind of stuck or burned on so far has been easily removed by light scrubbing.4. have patience and use oil or another fat to cook. I first attempted cooking an egg without any butter/oil – it did not go well. second attempt, I added butter, and I was flipping the thing around all over the place (pictured above). same with the sweet italian sausage patties.5. the cast iron support ring (pictured above). I got the cheap model – there are complaints that it breaks. I suggest handling it with care. It fits on the cheapo ministove that came with my studio apartment. I love it. It’s sitting on my 1200BTU burner and I can leave it on with my primary pot and some other cookware.6. cleaning. I have a cast iron pan – which I have kept free of water for several years now. the videos showing people cleaning woks at the sink made me… uncomfortable. but it works beautifully – spray&brush (lightly). I make sure to wipe dry with paper towel, heat to smoking, then re-season with peanut oil.7. fried rice. i’ve wanted to make fried rice since I was a kid 30 years ago. pictured above is my first and (as yet) only attempt. it was near perfect. again, I watched a lot of videos and followed direction. also deep fried some chicken wings in the style of my local New England Chinese restaurants. I think i’ll make some more for lunch!8. the handle. it is loose and expected to be loose – from drying out the wood. this happened when I superheated the metal to cure it. not a big deal to unscrew, tap/hammer in, and rescrew. I’m looking forward to staining and finishing the wood like another reviewer – a cherry stain sounds lovely9. I didn’t expect to use the wok that much. i’m so in love with it now it’s going to remain on my primary burner semi-permanently. again, I was very intimidated. especially after reading the reviews. it’s too easy to use once prepared and cared for properly. LOVE IT!final word – this is an authentic (!) piece of Chinese cookware. it is solid and sturdy and I expect it to last longer than I will, if well cared for.Variation: Size: 14-in
5.0 out of 5 stars Craft Wok Review: High-Quality, Easy Use & Authentic Cooking. A Culinary Game Changer! I recently purchased the Craft Wok Traditional Hand Hammered Carbon Steel Pow Wok and wanted to share my thoughts on this high-quality kitchen essential. Before seasoning, it’s important to blue the wok, a process I found straightforward. To ensure even bluing, I removed the wooden handle, which was a simple adjustment that allowed for a uniform treatment of the entire wok.The quality of the carbon steel is immediately noticeable—this wok has heft, indicating durability and robustness. It’s heavy in a good way, indicating its quality, yet not too cumbersome, allowing for easy tossing during cooking. The hand-hammered design is not just for looks; it contributes to the wok’s excellent performance. Heat distribution is proportional, though somewhat dependent on the burner used. While I have yet to try it on my outdoor wok burner, the round bottom was a perfect fit for my Bluestar Platinum stove, which has removable grates specifically designed for a wok.Many reviewers complain about the weight of the wok and how cooking and tossing with it feel awkward. However, these criticisms often stem from a misunderstanding of traditional Asian wok cooking techniques. Unlike Western-style cookware, where tossing and stirring are done with lighter pans, an Asian wok is designed to handle high-heat, stir-fry cooking. The weight of the wok plays a crucial role in maintaining even heat distribution, which is essential for achieving the perfect stir-fry texture and flavor. Instead of tossing ingredients by shaking the pan, you use a spatula or similar tool to stir and move the food quickly across the wok’s hot surface. Additionally, you can rest a portion of the rear of the wok on the stove to help push up and toss the food. This method ensures that each ingredient is cooked evenly and retains its unique texture and flavor. I recommend looking up videos on how to toss with Chinese woks for a visual guide. Practice with rice or uncooked pasta to get the hang of it.The handles feel good in the hand—sturdy and comfortable to use, enhancing the overall cooking experience. I found the wok easy to season and clean, a testament to its thoughtful design aimed at frequent use. As my first real wok, replacing a flat bottom, thin, non-stick wok that I was not happy with due to uneven heat zones, this wok has been a revelation.Value for money is exceptional with this wok. It’s the best for what you get, offering high quality, excellent performance, and ease of maintenance at a reasonable price. I would definitely recommend this wok to anyone looking for an authentic cooking experience. Whether you’re a seasoned chef or new to wok cooking, this tool will elevate your culinary creations.Variation: Size: 14-in